Friday, September 30, 2011

My First Soap Impression

Since the mistake last time, I've been thinking to avoid using castor oil and use other type of oil instead, not because I'm afraid of it but because I want to make s solid color soap since depending on the ratio of caster oil will determine how transparent the soap be. I got myself some shea butter and jojoba oil this time, both are very good oil for coating the skin with oil during winter. I whisk the soap a lot longer this time for some reason even though the hardness ratio is higher due to shea butter. Instead of using water, I used the brown rice water by soaking for a period of time, brown rice is good source of vitamin B and will add extra nutrient to the soap. I also tried using spirulina powder for more defined coloring and I also wanted to try out swirling technique by pouring color on different spot, then slowly draws the pattern along the coloring spot using a wooden stick. however, the solution turned out to be too thick for color to get in, so I learned that I'm suppose to do the coloring part when the solution is still runny and just starting to get trace.


Big news for me, I was also able to put stamp on my soap successfully this time, stamp sure give the soap extra personality.


Name:
Shea Butter Jojoba Lavender Brown Rice Soap
乳油木荷荷芭薰衣胚芽米手工皂

Ingredients:
Extra Virgin Olive oil
Palm oil
Coconut oil
Jojoba oil
Shea butter
Brown Rice Water
NaOH

Essential Oil:
100% Lavender Vanilla essential oil

Other:
Sea-derived spirulina powder

Un-Stamp-able (Layering Part II)

Soap making just keeps getting more fun each time, I look forward to making soap each week to try out all these different techniques. This time I tried another type of layering soap by mixing half of the solution with mung-bean powder to give it darker color, I also tried goat milk this time instead of milk/water. After several good luck of making soap successfully, bad luck finally got to me, I was trying to put stamp on the goat milk soap, for some reason, I cannot get the imprint to look right in the center because it's still very soft. Later on I found out from my friend that it could be caused by several reason:

1. Using castor oil will make the soap more sticky and harder to manage when it comes to stamping the soap
2. Too many powder material(such as mung-bean powder) will actually obsorb more moisture from air and soap itself therefore make it difficult to stamp in the center.

I learned from this mistake and will keep trying next time!

Name:
Grapeseed Eucalyptus Goat Milk Soap
葡萄籽藍膠由加利羊奶手工皂

Ingredients:
Extra Virgin Olive oil
Palms oil
Coconut oil
Grapeseed oil
Castor oil
NaOH
Goat Milk

Essential Oil:
100% Lavender Vanilla essential oil

Other:
Flaxseed
Mung-bean powder

My Birthday Surprise!

I received a surprise birthday present from my friend in Taiwan. I always wanted a stamp for my soap but finding one here in US isn't easy, my friend heard my dilemma and bought it for me from this Taiwanese soap crafter website and shipped all the way here for me. I was so happy and can't wait to make more soap.

Layering Soap Part I

Another technique in soap making is layering soap, there are two types of layering techniques, you can create layers by using powder-like materials so you see a thin line/divider after you cut the soap. Another type of layering soap is by mixing other half of the soap solution with powder material to create different color and pour it on top of rest of the soap solution. I don't really have any powder material that gives pretty color so I use mung-bean powder since I already had it. Here's what it looks like after I cut it :) My friend also suggested me to be careful when sprinkle powder on the soap, if you sprinkle too much, the soap run into risk of breaking in half as it becomes dry. If you sprinkle it too less, you won't 'be able to see the line clearly.

Name:
Grapeseed Eucalyptus Mung-Bean Soap
藍膠尤佳利葡萄籽綠豆粉手工皂

Ingredients:
Extra Virgin Olive oil
Palms oil
Coconut oil
Grapeseed oil
Castor oil
NaOH
H2O

Essential Oil:
100% Eucalyptus essential oil

Other:
Mung-bean powder

Soap Within Soap

Soap making leaves plenty of room for creativity. This time I tried "Soap within a soap" meaning after pouring the soap into the mold, I throw in few pieces of other type of soap in so when you cut it, you will see pattern within the soap, think of it like a sushi roll, the pattern will be different depending on the type of ingredients you put in. Not only it's fun to do this, it puts the left over soap to use rather than going wasted. I used the same type of ingredients again with milk base, and I throw in left over soap from the Eucalyptus Milk Soap. Another good news to share, my soap mold works well, I can now have full length rectangular bar soap now :)


Name:
Rosemary Ginger Milk Soap
迷迭薑鮮奶手工皂

Ingredients:
Rosemary soak in Olive oil
Shea butter
Palm oil
Grapeseed oil
Castor oil
Coconut oil
Organic Milk
NaOH

Essential Oil:
100% pure Ginger essential oil

Other:
Mung-Bean Powder

Handmade Soap Mold and Cutter

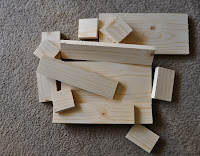
After a long time looking for a reasonable price soap mold and soap cutter online, I decided to make one myself. I learned this in my character animation class that good planning will save you a lot of headache later on. So I made sure I design and plan my soap mold layout well. Originally I was going to have a separate lid for the soap mold, then I thought, why not just use the base of the soap cutter as the soap mold lid to save extra piece of wood and cost? here's what I had:

I then went to both Home Depot and Lowe's comparing the price and quality of the wood, one thing I noticed is the dimension at Lowe's seems to be off a bit, instead of 3.75", they just labeled it as 4", so not a good idea if you are going to precision. I picked my wood and had them cut for me in pieces, and took it home, then the fun began.....
I was pretty excited when I was done, it always feels good to design and make something yourself, my soap cutter and soap mold combo idea works and I couldn't be any more proud :) I can now make 10" x 2.5" x 1" bar, with the flexibility to do 10" x 3.25" x 1" or 10" x 4" x 1" with additional piece of wood.


Milk Soap

This time, my goal is to make a milk soap. Milk has tons of nutrient in it and is too good to go to waste. In order to do that, I have to freeze the milk first, so the temperature will be kept under control when interact with NaOH, I really want to do all my soap in cold process just because I hate wasting good nutritious value that I spent so much time and money on :) Again, the ideal temperature should be kept under 104 F or 45 C, I used the same ingredient like my last soap except that I used organic whole milk instead of water. Many people might think using milk will produce white-ish color soap, but in contrast, the chemical reaction between milk and NaOH will give brown color intead. After one month of curing the soap, I now realize what my friend meant by milk soap is more hydrating, because even after one month of curing, I can still feel moisture when I touch the soap. The regular water base soap will still hydrate your skin, it's just not as powerful as the milk soap.

Name:
Grapeseed Eucalyptus Milk Soap
尤加利葡萄籽鮮奶手工皂

Ingredients:
Olive oil
Palm oil
Grapeseed oil
Caster oil
Coconut oil
Organic Milk
NaOH

Essential Oil:
100% pure Eucalyptus essential oil